VirtualBox & Mac OS. MacOS & VirtualBox. No matter how you spin it, it all boils down to how do I get MacOS installed within a VirtualBox on my Windows computer.
Much like installing Google Play on a Kindle Fire, figuring out why your iPhone 6 won’t charge or transferring from Coinbase to Binance, running MacOS Sierra on Windows 10 is pretty easy.
VirtualBox OSX
Things You Need To Install Mac OS Sierra in VirtualBox on Windows 10
Before you rush through the tutorial, there are a few things to consider. You must meet the following minimum requirements to safely install OSX Sierra in VirtualBox:
Minimum Requirements
- a 64-Bit Computer
- at least 4GB RAM
- a Dual-Core processor
Once you have a Windows 10 PC with the above specs or above, then you may proceed to download the necessary software to begin the installation process.
Download Links
What’s the difference between the two download options for Sierra 10.12? The first is a full download. You should only attempt this if you have a fast internet connection or during periods when not many devices are connected and/or using your internet connection. However, if your internet is slow, then you should opt to download the 6 separate 1GB files in option 2.
Also, read:
- Fix Unidentified Network – No Internet Access Error Windows
- Automatically Close Applications During Shut Down Windows 10
- Revert Windows 10 Devices to Windows 7/8/8.1
- Best Laptop WiFi Hotspot Software For Windows
How To Install macOS Sierra In VirtualBox On Windows 10
Once you complete the above downloads, you are now ready to install and run MacOS Sierra on Windows 10. In the following sections, we take you through the 5 quick and easy steps to do this.
Extract The Image File With Winrar
Firstly, you need to use a program such as Winrar or 7Zip to extract the contents of the image file. Do you already have an extractor? Then, go ahead and extract the file. If not, download Winrar via the link above and then follow the extraction information below:
- Right click on the downloaded macOS 10.12 Sierra file.
- Then, select Extract Here.
Install VirtualBox
- Double click the VirtualBox file you downloaded earlier.
- Then, follow the onscreen instructions to install VirtualBox on your PC.
Create A Virtual Machine
Once the VirtualBox installation completes, launch the application. Then, in the upper left-hand side, click New. In each of the fields, input the following (view image for reference):
- Name: macOS 10.12 Sierra
- Type: Mac OS X
- Version: Mac OS X 10.11 El Capitan (64 bit) or 10.12 Sierra
- Memory size is 4 GB ( 70% of your Ram )
- Virtual disk file: macOS 10.12 Sierra.vmdk
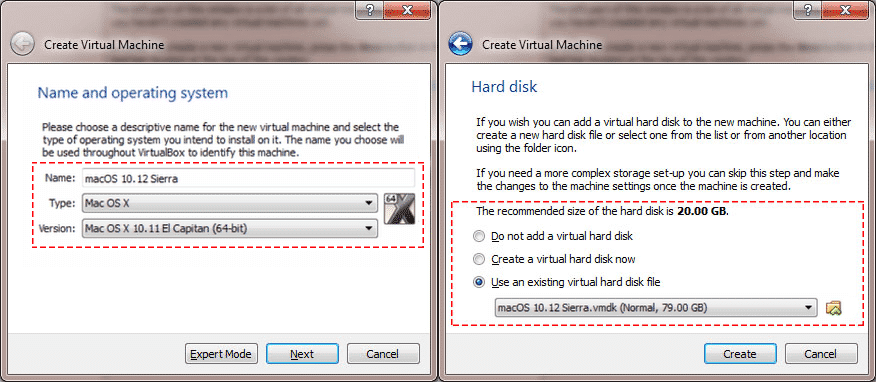
Steps For Creating A New Virtual Machine In VirtualBox
You might also like:
- Windows Emulator For Mac
- How To Fix A MacBook That Won’t Boot Past White Screen
- Windows 10 Encryption Setup Tips & Tricks
- How To Factory Reset A MacBook Air
- User Profile Service Failed Logon User Profile Cannot Be Loaded Fix
Edit The Virtual Machine
- Firstly, via the VirtualBox interface, tap Settings.
- To your right, select General and ensure that everything is set to default.
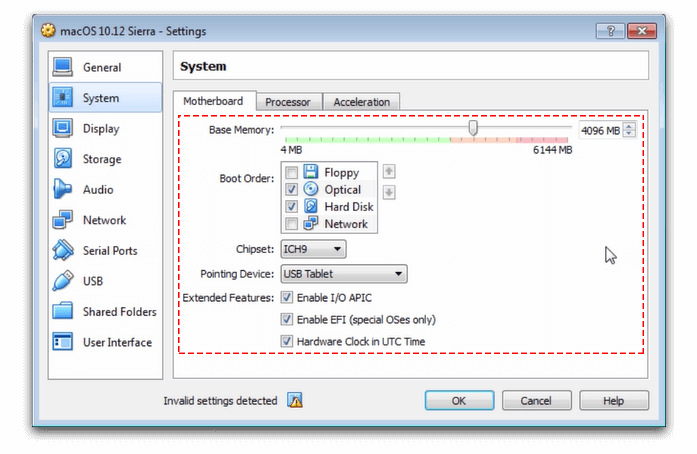
- Then, under general, select System.
Now for the easy part. Using the photo guide below for reference, input the following information:
- CPU: Select 2 CPU (you can choose more than 2 if you want but it is entirely according to your CPU) and then enable PAE/NX
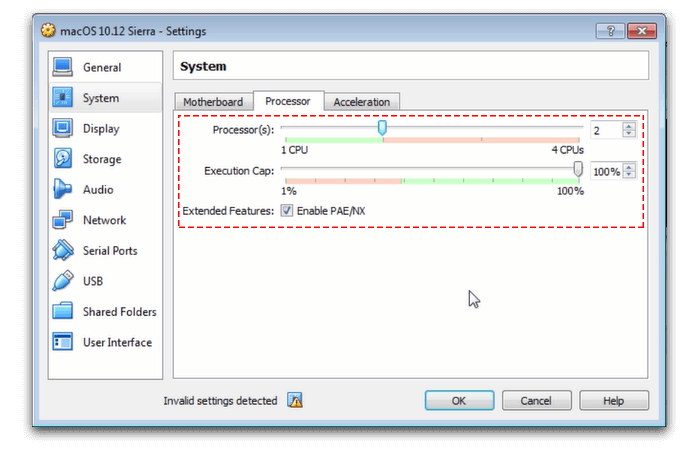
Choose The Number Of CPUs For Your Virtual Machine
Other articles of interest:
- System: Then, you have to enable EFI and disable Floppy. Next, make sure you set the Chipset t0 IHC9 (you may also choose PIIX3).
Also, read these articles:
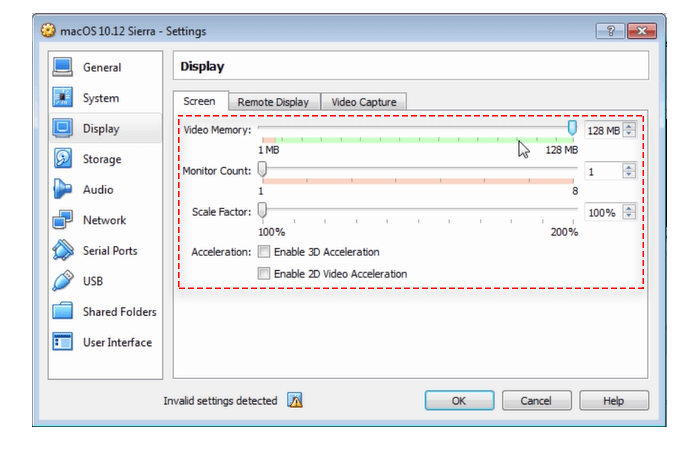
- Graphics: Set your Video Memory to 128MB
For further reading, see:
- Fix: “Windows 10 Brightness Control not Working”
- Active Directory: Check & Raise Domain, Forest Functional Level
- Tweetbot For Windows – An Alternative
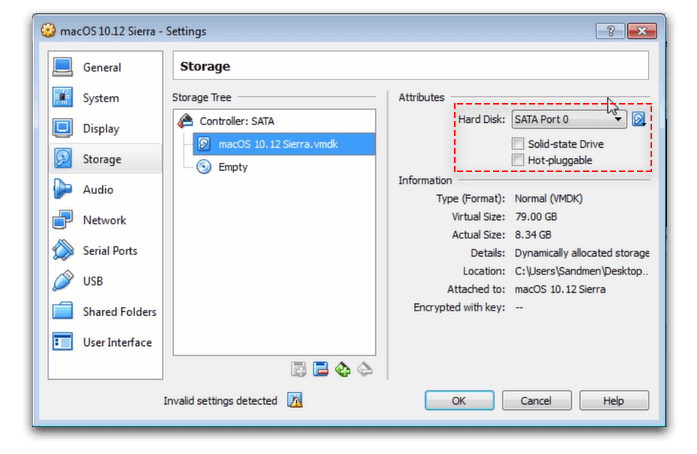
- Storage: Lastly, choose your macOS 10.12 Sierra.vmdk and under Attributes, set the Hard Disk to SATA Port 0. Once done, click OK. Remember to close/exit the VirtualBox application.
Read:
- Make Custom Ringtones On iOS Via iTunes For Your iPhone
- How To Download Windows Spotlight Images
- Fix: HDMI Sound Not Working Windows 10
- How To Get Microsoft Edge for Android
Add Code To VirtualBox Via Command Prompt
Firstly, using a program such as Notepad, replace the phrase “Your VM Name” in the below code with your own virtual machine name which you can find via General, under Basic.
cd "C:\Program Files\Oracle\VirtualBox\"
VBoxManage.exe modifyvm "Your VM Name" --cpuidset 00000001 000106e5 00100800 0098e3fd bfebfbff
VBoxManage setextradata "Your VM Name" "VBoxInternal/Devices/efi/0/Config/DmiSystemProduct" "iMac11,3"
VBoxManage setextradata "Your VM Name" "VBoxInternal/Devices/efi/0/Config/DmiSystemVersion" "1.0"
VBoxManage setextradata "Your VM Name" "VBoxInternal/Devices/efi/0/Config/DmiBoardProduct" "Iloveapple"
VBoxManage setextradata "Your VM Name" "VBoxInternal/Devices/smc/0/Config/DeviceKey" "ourhardworkbythesewordsguardedpleasedontsteal(c)AppleComputerInc"
VBoxManage setextradata "Your VM Name" "VBoxInternal/Devices/smc/0/Config/GetKeyFromRealSMC" 1
Once you edit the code, launch Command Prompt (cmd) and Run as an administrator. To do this, press and hold the Windows Key and X at the same time. Also, if you do not see CMD, PowerShell is the equivalent. In the window that appears, paste the code one by one (line by line).
Also, read:
- How To Setup Dual Monitors For Windows
- Evernote Alternatives To Try
- How to Fix “DNS Server Unavailable” Error
Execute The Virtual Machine
- Firstly, open VirtualBox then click on Start or Run the macOS Sierra VM.
- Then, a black screen of code appears. Let it run.
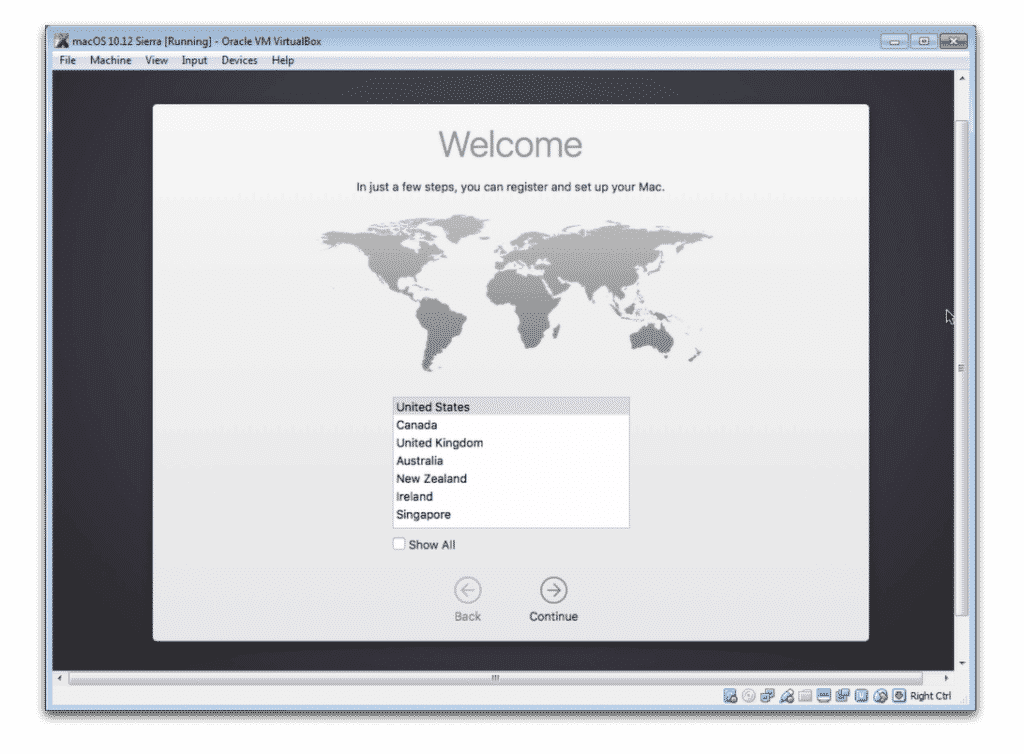
- Once complete, you ought to see MacOS Sierra’s introduction.
Check out the following:
- Microsoft Edge: A Definitive Guide
- (Solved) Fix Windows Update Error 80072f8f
- How To Transfer Photos From iPhone To Computer