On a Mac, there are a set of keys that allow you to perform a print screen in various ways. Unlike Windows, where there is just a set key combination that lets you take a screenshot, the Mac takes it a bit further with smart screenshots. Here’s how to screenshot on Mac.
Please note that this is an updated article, below the updated section is the old version of the article, you do not need to read that section. There is a line where the update ends and where the old article begins.
How To Screenshot On Mac
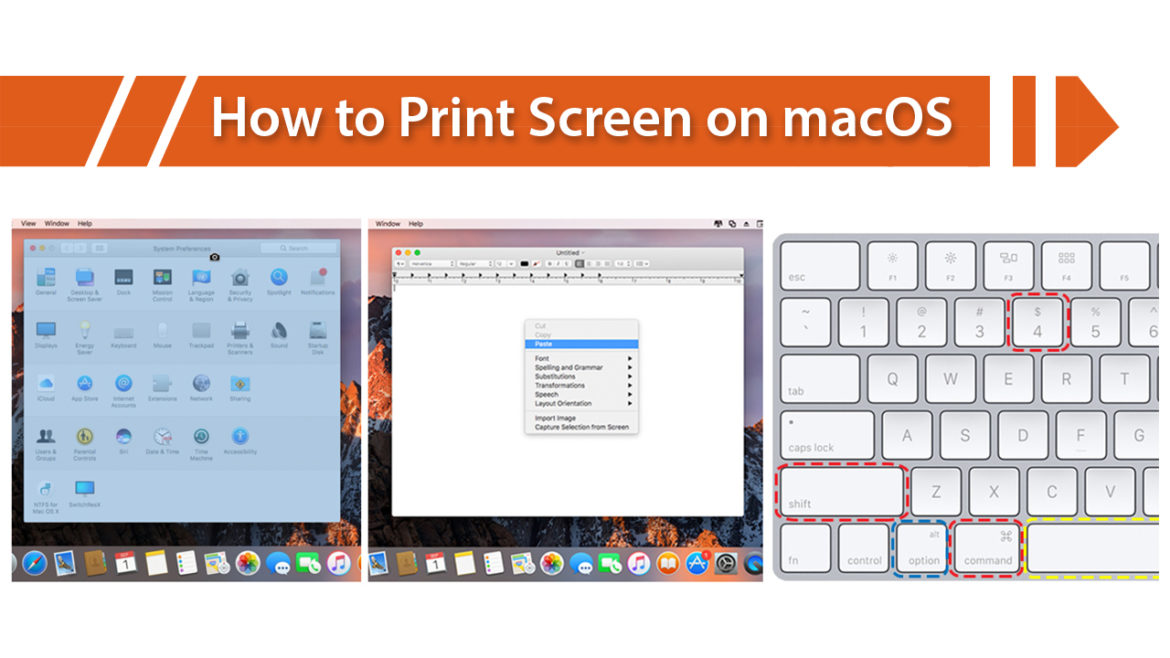
How To Print Screen On Mac
- Press the Command + Shift + 3 key together
- Your screen capture is saved on the desktop as ‘Picture_’ followed by a number (the number of screen capture)
The above command captures the entire screen. It’s the most common way of taking a Mac screenshot. However, with a Mac, you can also print a specific portion of your screen. Here’s how to do this.
How To Print Part Of Your Screen On Mac
- Press Command+Shift+4
- This changes your cursor to a +(cross-hair)
- You can then click and drag to select a particular section of the screen that you want to capture.
- Once you do that, the portion is automatically captured and saved to your desktop.
Again, the file format is ‘Picture_’ followed by a number (the number of screen capture). You can also capture a Window on your Mac. Read on for how to do this.
How To Capture A Specific Window On A Mac
- Press Command+Shift+4
- When the cursor changes to a cross-hair (+), press the spacebar.
- The cursor now changes to a camera icon
- Point and click the camera icon in the window that you want to capture
- The picture, as usual, will be saved on the desktop as ‘Picture_’ followed by a number (the number of screen capture).
For a visual guide with photos and videos, please see the old article section below. The above was made to simplify the instructions for anyone wanting a quick and easy guide.
Do you want to know how to take a screenshot on Mac computers? And, where do screenshots go on Mac after you take a few? If you’re a Windows user switching over to Mac or you’re a new MacBook user, then it may not be as straightforward as you think. There is no print screen button on Mac keyboards. So, by just looking at the keyboard on your MacBook Pro or MacBook Air, there’s no way to tell how to screenshot Mac’s screen. Nonetheless, this article outlines the various ways that you can save a screenshot on any Mac computer.
How To Take Screenshots On Mac PCs | Keyboard Shortcut
Although there is no print screen button on the Mac OS keyboard, there are other commands that you can enter to save a screenshot of your Mac’s display. Moreover, there is not just one way to do this; there are several. Let me take you through each of these methods.
Command + Shift + 3 | Take Screenshot of Mac Desktop
The first command is Command + Shift + 3. This command tells your MacBook to capture the entire screen as it appears the moment you enter the command. Here is a visual representation of the keys,
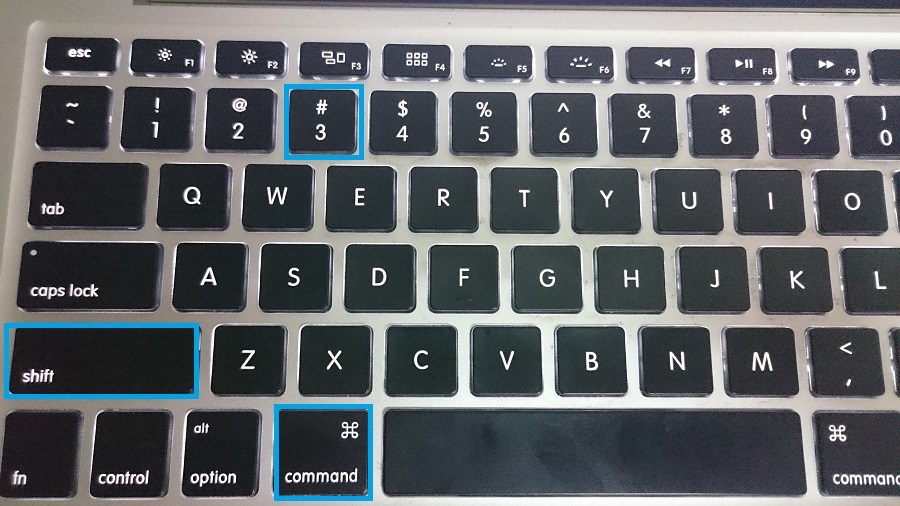
Command + Shift + 3: Quickly Screenshot Your Mac’s Screen.
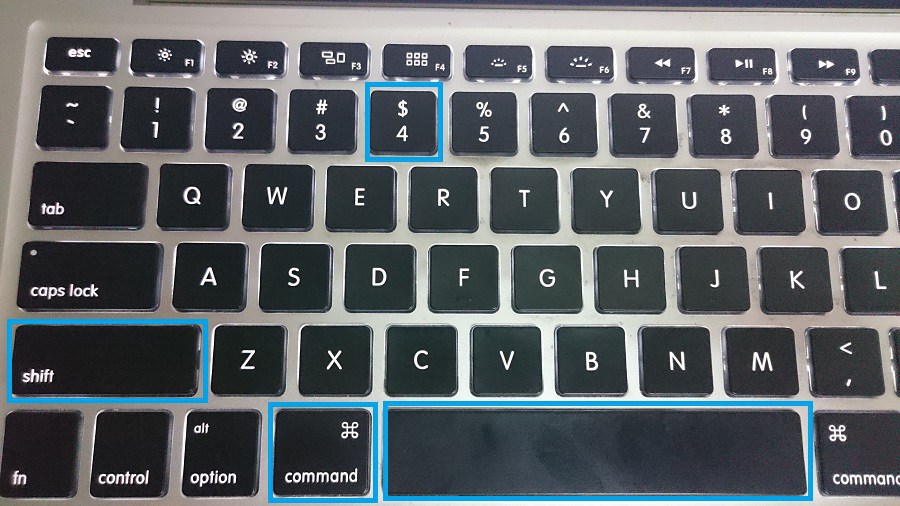
Command + Shift + 4 | Capture A Specific Area of MacBook’s Screen
To take a screenshot of a selected portion of your screen press Command + Shift + 4. The mouse pointer converts to a crosshair. Use the crosshair to select the area of the screen that you want to capture. While dragging the crosshair, hold Shift, Option, or the Space bar to change the way the selection moves.
Once you select the area you want, release the mouse or trackpad button. To cancel, press the Esc (Escape) key before you release the button. The computer saves the selected portion of the screen. For a visual representation, view the screen below.

Command Shift 4 – Take Screenshot of Specific Area
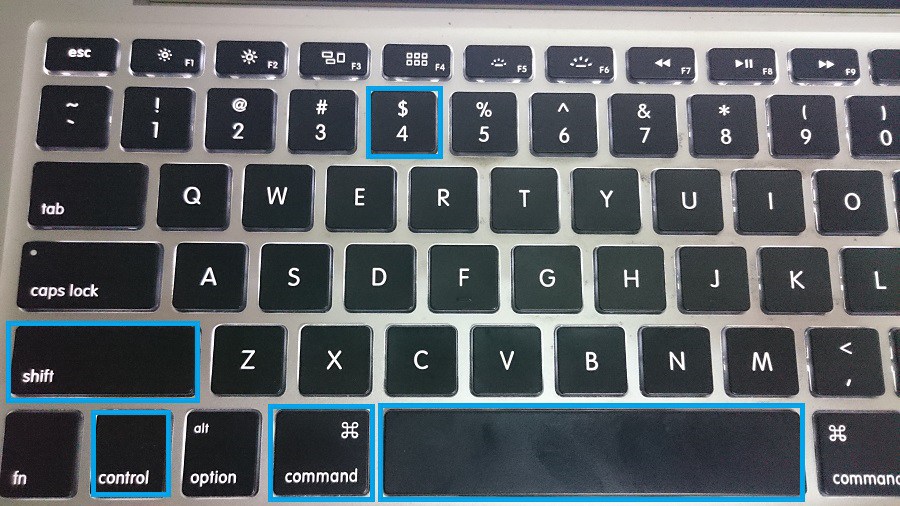
Command Shift 4 Space | Take a Screenshot of a Window
Do you have a window open on your MacBook? Well, if you want to capture an image of that window only, you can. Press Shift-Command-4 like before. However, this time, when the pointer turns to a crosshair, click or tap the Spacebar button. The crosshair now converts to a camera. Move the camera over the desired window and click the mouse or trackpad to capture the screenshot. Cancel by pressing Esc (Escape) before clicking.
Command + Shift + 4 hit Space – Save Window Screenshot MacBook
How to Take a Screenshot of a Menu on Mac
Getting weirder by the second here. But, the Mac OS also allows you to take snaps of the menu. Start off with the Shift-Command-4 as before. When the cursor switches to a crosshair, you have to drag and select the menu you want to screen capture. Release the mouse or trackpad to complete the screen grab. However, to take a screenshot of the menu with the title, one must use the Shift-Command-4 then press the spacebar to bring up the camera icon. Highlight the menu and click the mouse or trackpad.
Shift-Command-6 | How to Take Screenshot of Mac Touch Bar
You guessed it! You can also take screenshots of the Touch Bar on your Mac. However, it must be running macOS Sierra 10.12.2 or later to do so. Press Shift-Command-6 to screenshot the touch bar.
Where Do Screenshots Go on Mac
Ok. You took a bunch of screenshots. How can you find them? By default, screenshots taken on Mac computers running Mac OS X v10.6 and above save right on the desktop in .PNG format. The default filename looks something like “Screen Shot date at time.png.”. Save your screenshot to the Clipboard instead of your desktop, add Control to the key combinations above. For example, press Control-Shift-Command-3 instead of Shift-Command-3.
Command + Control + Shift + 3 – Screenshot Mac Screen to Clipboard
You should know that you can open Screenshots with Preview, Safari, and other apps that can edit or view images. Additionally, apps, like DVD Player, may not let you take screenshots of their windows. Lastly, you may customize the Control Strip region of your Touch Bar to include a Screenshot button. Then, tap the Screenshot button to see options for the type of screenshot and where to save it.
Take a Screenshot on Mac OS X Using Grab
Given the numerous ways of taking screenshots on your shiny Apple computer, it’s only fair that I provide you with an alternative way to take screen captures. It may prove easier for some. If you’re familiar with the Snipping Tool for Windows PCs, then you will be pleased to know that Apple has a similar product called Grab. You can access Grab in Application/Utilities/Grab. Or, use Spotlight Search to locate the program.
Video: How To Screen Capture on a Mac (Print Screen / Screenshot) Basic Keystroke + Advanced Commands
Video: How to Take a Screenshot on your Macbook Air, Pro or Mac Capture Screen image
Thanks for reading How To Take Screenshot On Mac | MacBook Pro, MacBook Air Screenshot here on ORDUH. You might want to check out some of the best antiviruses for Mac (yes, they do get infected). And, if you own an Android phone, please read about ADB & Fastboot for Mac OS.