Generally, you have to set Windows 10 to show hidden files¹. Why? Because by default, Microsoft hides certain files from users like you and me. This protects important files from being deleted so that the system isn’t damaged. So, how do I see hidden files? In this article, we teach you how to show hidden files on Windows 10.
Here’s a view of the setting that reveals hidden files in Windows 10
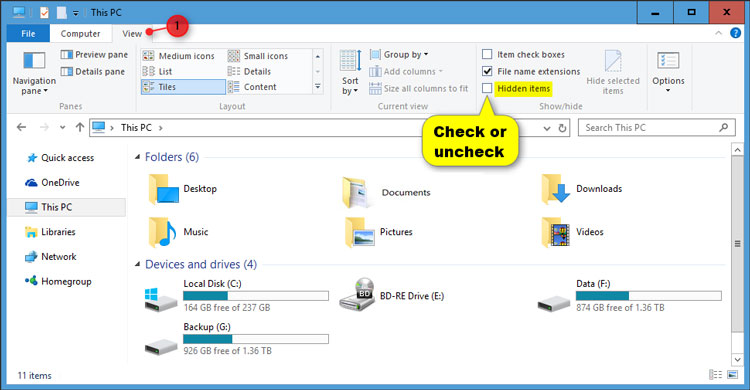
Show Hidden Files Via File Explorer
- Firstly, click/Tap the Windows start button.
- Then, search for/select File Explorer.
- Then, click/tap the view tab (see image).
- Lastly, check the “Hidden items” checkbox to view hidden items.
Also, read:
- How Do I Remove OneDrive From Windows 10 PC?
- Is There A Way To Use Superfetch In Windows 10?
- Here’s How To Change The Default Login Screen Background On Windows 10
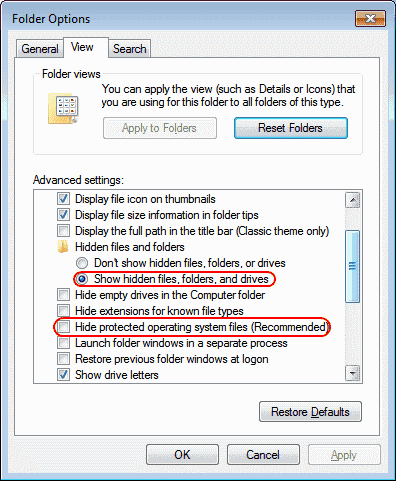
Find Hidden Files Via Control Panel
- Firstly, click/tap the “Start” button, then select/search for “Control Panel”.
- Then, navigate to “Appearance and Personalization”.
- Then, select “File Explorer Options”.
- Here, click the “View” tab.
- Lastly, scroll to and change the “Hidden files and folders” setting to “Show hidden files, folders, and drives”.
Additionally, you may want to uncheck the “Hide protected operating system files” box. However, this step is not necessary for most users. Check the image below for a visual representation of the above steps.
Also, read:
- Why Is My Internet So Slow? – Ways To Speed Up Network Connection
- How To Install MacOS Sierra In VirtualBox On Windows 10 PC
- Top Windows 10 Encryption Setup Tips & Tricks
- Fix: HDMI Sound Not Working Windows 10
You might also like:
- How To Tell Where A Picture Was Taken
- How To Downgrade Back To Windows 7
- Easy Ways to Fix “DNS Server Unavailable” Error
- How To Setup Dual Monitors For Windows
See Hidden Files Using Registry Editor
- Firstly, hold the Windows Key and press “R” to open the Run dialog box.
- Then, type “regedit“, and hit “Enter“.
- In the interface that appears, navigate to:
- HKEY_CURRENT_USER
- Software
- Microsoft
- Windows
- CurrentVersion
- Explorer
- Advanced
- Set the value for “Hidden” to “1” to show hidden files, folders, and drives. Set the value to “2” to not show hidden files, folders, and drives.
- Set the value for “ShowSuperHidden” to “1” to show protected operating system files. Set the value to “2” to not show protected operating system files.
Also, read:
- Best Laptop WiFi Hotspot Software For Windows
- How to Auto Login Windows 10 Computers
- How To Download Windows Spotlight Images
- Remove Action Center from Taskbar Windows 10
- Automatically Close Applications During Shut Down Windows 10