Superfetch (also known as Prefetch) feature caches data so that it can be immediately available for your application. This feature affects the performance of certain applications. For example, it tends to not work well with gaming but can improve performance with business apps. If you want to enable Superfectch, this guide teaches you how to do so.
What is Superfectch in Windows?
SuperFetch¹ is part of Windows‘ memory manager. SuperFetch seeks to ensure that often-accessed data serves quickly from the fast RAM instead of the slow hard drive. It is a technology that allows Windows to control the amount of random access memory on the computer it runs on more efficiently.
Moreover, Superfetch reduces boot time and causes applications that you frequently use to load more effectively. SuperFetch also takes timing into account, in that it adapts to your usage patterns. Below, we tell you how to enable Superfetch on Windows.
How To Enable Superfetch in Windows 10, 8 or 7?
- Hold the Windows Key, while pressing “R.” Doing so brings up the Run dialog box.
- Type “services.msc”, then press “Enter.”
- The Services window displays.
- Now, find “Superfetch” in the list.
- Right-click “Superfetch,“ then select “Properties.“
- Select the “Start” button if you wish to launch the service.
- Furthermore, in the “Startup type” drop-down menu, choose “Enabled.”
You can also enable the Superfetch service via the Registry. To do so, follow the guideline below:
Enable Superfetch Service Via Registry Editor
- Hold the Windows Key, while pressing “R” to open the Run dialog box.
- Type “Regedit,“ then press “Enter.“
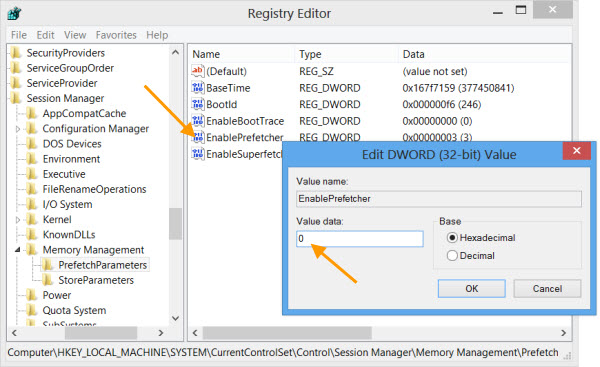
- The Registry Editor window appears. Navigate to the following location in the Registry.
- HKEY_LOCAL_MACHINE
- SYSTEM
- CurrentControlSet
- Control
- Session Manager
- MemoryManagement
- PrefetchParameters
- On the right side, double-click on “EnableSuperfetch.”
- However, if this value doesn’t exist, right-click the “PrefetchParameters” folder, then choose “New” > “DWORD Value.”
- Type: EnableSuperfetch and press Enter.
- Give “EnableSuperfetch” the following to enable it:
- 1 – to enable prefetching when program is launched
- 2 – to enable boot prefetching
- 3 – to enable prefetching of everything
- Select “OK.“
- Close the Registry Editor.
How To Disable Superfectch in Windows 7, 8 or 10?
- Hold the Windows Key, while pressing “R.” Doing so brings up the Run dialog box.
- Type “services.msc”, then press “Enter.”
- The Services window displays.
- Now, find “Superfetch” in the list.
- Right-click “Superfetch,“ then select “Properties.“
- Select the “Stop” button if you wish to halt the service.
- Furthermore, in the “Startup type” drop-down menu, choose “Disabled.”
Disable Superfetch Services Via Registry Editor
- Hold the Windows Key, while pressing “R” to open the Run dialog box.
- Type “Regedit,“ then press “Enter.“
- The Registry Editor window appears. Navigate to the following location in the Registry.
- HKEY_LOCAL_MACHINE
- SYSTEM
- CurrentControlSet
- Control
- Session Manager
- MemoryManagement
- PrefetchParameters
- On the right side, double-click on “EnableSuperfetch.”
- However, if this value doesn’t exist, right-click the “PrefetchParameters” folder, then choose “New” > “DWORD Value.”
- Type: EnableSuperfetch and press Enter.
- Give “EnableSuperfetch” the following value to disable it:
- 0 – to disable Prefetch
- Select “OK.“
- Close the Registry Editor.
Video: Windows 10 Disable And Enable Prefetch And Superfetch
By default, the computer stores prefetch data in “C:\Windows\Prefetch.” Furthermore, If you disable Superfetch and want to enable it for individual applications, you can use a particular switch in the program shortcut: /prefetch:1.
Did you like this article? Then, you might also want to check out:
- IPv6 – What is IPv6? How to Disable IPv6?
- How to Fix High CPU Usage By Antimalware Service Executable – MsMpEng
- Here’s How To Fix DNS Probe Finished Bad Config Errors
- ERR_CONNECTION_RESET: Chrome, YouTube, Windows Fix
- One or More Network Protocols Are Missing – Ways to Fix
- How To Fix Error 0x80004005