If you are experiencing connection problems and cannot connect to iTunes store on your iPhone or iPad, the guidelines outlined in this article help you fix the problem and resolve any error messages relating to the iTunes store. Most of the times, the error occurs when you open the iTunes app, follow the steps outlined below to troubleshoot and fix the issue.
Check Network Connection/Cellular Data
Firstly, you want to ensure that your network connection, whether it be a via a wifi network or cellular data, works correctly. After all, connected to the internet to use iTunes. To do this, check the following:
- Be sure that you are within range of your WI-FI router.
- Ensure that devices such as your Mac are able to connect to your WI-FI network.
- And, most important, that they are able to access the internet.
- Try resetting WI-FI router — Turn it off for 10 seconds and then turn it on.
- You can do the same for your iPhone, iPad cellular data connection by disabling it for a few seconds then turn it back on.
Reset Network Settings
- Go to Settings –> General –> Reset –> Reset Network Settings
- Restart your iOS device and try connecting to the App Store.
Disconnect/Reconnect iTunes
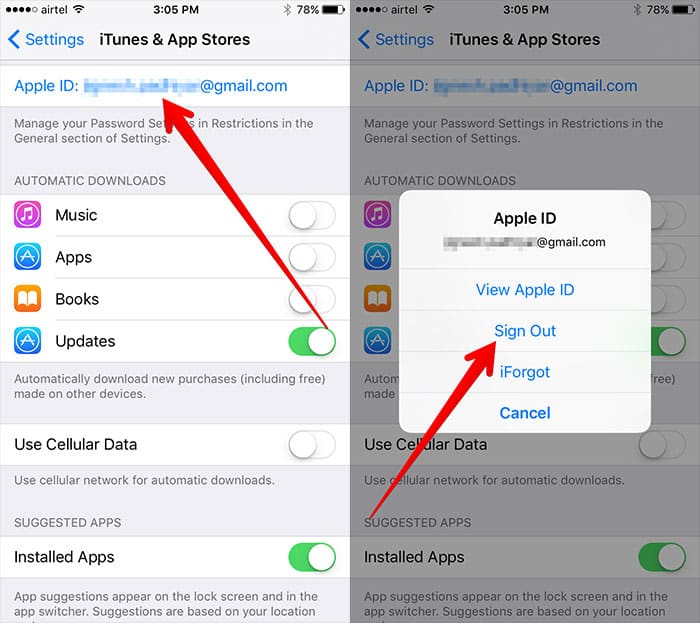
iPhone won’t connect to iTunes store? Sign out of iTunes.
Similar to when you cannot connect to the App store, you may want to disconnect the iTunes connection linked to your iPhone/iPad’s app store. After which, you simply re-login using your Apple ID.
- Press the Home Button to go to the home screen.
- Open the Settings App
- Select iTunes & App Store
- Tap on your Apple ID
- Then, tap on “Sign Out”
- Lastly, from the same page, sign in again with your Apple ID and password.
Check Your Date/Time Settings
The date and time on your operating system can affect the functionality of certain apps. This includes the iTunes store. What you want to do is Set Automatically to enabled in your iOS system settings. Follow the steps below to do this:
- Go to Settings → General → Data & Time
- Here, switch the Set Automatically ON
- Lastly, exit iTunes (close it completely) and reopen it.
If you are using your Mac: Open System Preferences > Date & Time. Pr, if you are using your Apple TV: Go to Settings > General > Date and Time. Here you will find the automatic time and date setting.
Update Your Software
Much like a system software update, you need to ensure that you have the latest version of iTunes installed in order to avoid connection issues. This is also true for your version of iOS. Be sure to run a check via Settings—General—Software Update. The above tips also work if you cannot connect to App Store as well.
If you are on Mac, ensure that your Mac OS X version is up to date. For Windows PC, ensure that the iTunes application is up to date. Which brings us to troubleshooting Windows firewall and Mac firewall problems.
Check Windows Firewall Settings
If can’t connect to iTunes store on Windows, verify that your firewall settings allow the store to make the connection in the first place. There is a good article on the Apple website explaining how to do this. Hence, we won’t go too in-depth here. However, here’s the basic gist of the article with links to the relevant sections:
- Check to see if you’ve turned on third-party security software or Windows Firewall. If you have, your settings might not let you connect to the iTunes Store, and you might need to change them.
- Check your Windows proxy server settings.
- If you see only a blank white screen with the words iTunes Store on it, you might have a conflict between software that monitors Internet traffic and Apple software.
Check Mac Firewall Settings
For Mac users, Apple¹ recommends the following:
- Click your desktop to make sure that you’re in Finder.
- From the menu at the top of your computer screen, select Go > Go to Folder.
- In the box, enter:
/var/db/crls/ - Click Go.
- Drag the files labeled;
crlcache.dbocspcache.dbto the Trash. - If prompted, enter your administrator password.
- Restart your Mac, then try to connect to the iTunes Store, iBooks Store, or App Store.
Check Your Host Files
If for some reason you realize that iTunes could not connect to the iTunes store after all the above troubleshooting tips, you can try to reset your Host Files in an attempt to solve the issue. This is a complex and delicate step that you must handle with care. Here are the Microsoft² recommended steps:
- Open Notepad.
- Hit the start button, tap Search, type Notepad, and then tap the Notepad icon.
- Copy the following text, and then paste the text into the file:
Default Host Files Info
# Copyright (c) 1993-2006 Microsoft Corp.
#
# This is a sample HOSTS file used by Microsoft TCP/IP for Windows.
#
# This file contains the mappings of IP addresses to host names. Each
# entry should be kept on an individual line. The IP address should
# be placed in the first column followed by the corresponding host name.
# The IP address and the host name should be separated by at least one
# space.
#
# Additionally, comments (such as these) may be inserted on individual
# lines or following the machine name denoted by a '#' symbol.
#
# For example:
#
#      102.54.94.97     rhino.acme.com          # source server
#       38.25.63.10     x.acme.com              # x client host
# localhost name resolution is handle within DNS itself.
#       127.0.0.1       localhost
#       ::1             localhost
- On the File menu, select Save as, type “hosts” in the File name box (as displayed in the following image), and then save the file to the desktop.
- Close Notepad.
- Open the %WinDir%\System32\Drivers\Etc folder. To do this, follow these steps:
- Swipe in from the right edge of the screen, tap Search, type run, and then tap the Run icon. Or, if you are using a mouse, point to the upper-right corner of the screen, move the mouse pointer down, select Search, type run, and then select the Run icon.
- Type %WinDir%\System32\Drivers\Etc in the Open box, and then select OK.
- Select the Hosts file, select Rename, and then rename the file as “Hosts.old”.
- Copy or move the Hosts file that you created in step 3 to the %WinDir%\System32\Drivers\Etc folder. If you are prompted to enter an administrator password, tap or click Continue.
Still Cannot Connect To iTunes Store?
Lastly, if you still cannot connect to iTunes store, reboot your iPhone or perform a hard reset. To perform a hard reset depends on the version of iPhone that you own:
- Reset An iPhone 5
- iPhone 6 Reset Instructions
- How To Reset The iPhone 7
- iPhone 8 Reset Tutorial
- How To Reset An iPhone X
If you like this article, you may also like the following:
- Siri Not Working On Your iPhone? Here’s The Fix
- Top Emoji App | Best Emoji Keyboard for iPhone
- View Full Version of Facebook iPhone
- How To Get iMessage On PC
- iMessage Waiting For Activation? Activate iMessage Now!