Transferring pictures from an iPhone to a Mac¹ is much simpler than doing so on a Windows PC. This is because iOS devices offer near perfect sync capabilities with each other. If you have an iPhone and a Mac, there are six ways to transfer photos. In this article, we discuss how to easily transfer photos from iPhone to Mac.
How To Upload Images From iPhone To Mac With iCloud Photo Library
With iCloud Photo Library, you can access your photos and videos from your iPhone, iPad, iPod touch, Mac, Apple TV, on iCloud.com, Your latest images are automatically synced to your iCloud Photo Library, and any changes or edits you make are synced across all your devices
Before You Begin:
- Make sure that the software is up to date on your iPhone, iPad, or iPod touch, your Mac.
- Set up iCloud on all of your devices.
- Make sure that you’re signed in to iCloud with the same Apple ID on all of your devices.
- Make sure that your device is connected to Wi-Fi.
Turn On iCloud Photo Library
- On your iPhone, iPad, or iPod touch, go to Settings > [your name] > iCloud > Photos, then turn on iCloud Photo Library. If you’re using iOS 10.2 or earlier, go to Settings > iCloud > Photos.
- On your Mac, go to System Preferences > iCloud. Click the Options button next to Photos, then select iCloud Photo Library.
- Your photos now sync across both devices.
How To Transfer Photos From iPhone To Mac With Preview

An image describing how to transfer photos from iPhone to Mac using the Preview App on a Mac computer.
You may export photos from your iPhone to your Mac using the Preview app. To do this, follow the below instructions:
- Connect your iOS device to your Mac via the USB cable.
- Open the Preview application.
- In the upper left corner, select File.
- Then, choose the option to import from your iPhone or iPad.
- You have the option to import selected photos or import all photos.
- Lastly, select the folder to which you want to upload your images.
How To Import Photos From iPhone To Mac Using Photos App

An image describing how to import photos from iPhone to Mac using the Photos App on a Mac computer.
This method requires you to use the photos app on your Mac to upload photos from your iPhone. Photos replaced the iPhoto and Aperture on Mac OS X Yosemite or El Capitan. Here’s how to use it to move your photos to your Mac:
- Start the Photos App on your Mac computer.
- Connect your iPhone to your Mac using the USB cable.
- Then, in the Photos App, click the import tab.
- Now, select the photos that you wish to upload to your Mac.
- Lastly, click Import XX Selected or Import All Items to transfer photos to Mac.
How To Upload Photos From iPhone To Mac Using iPhoto

A picture illustrating how to upload photos from iPhone to Mac using the iPhoto application on Mac computers.
- Firstly, connect your iPhone to your Mac using the USB cable.
- iPhoto ought to start automatically. However, if not, start iPhoto yourself.
- From the iPhoto interface, select the pictures that wish to import to your Mac.
- Lastly, click the import button.
How To Transfer Pictures From iPhone To Mac With Image Capture
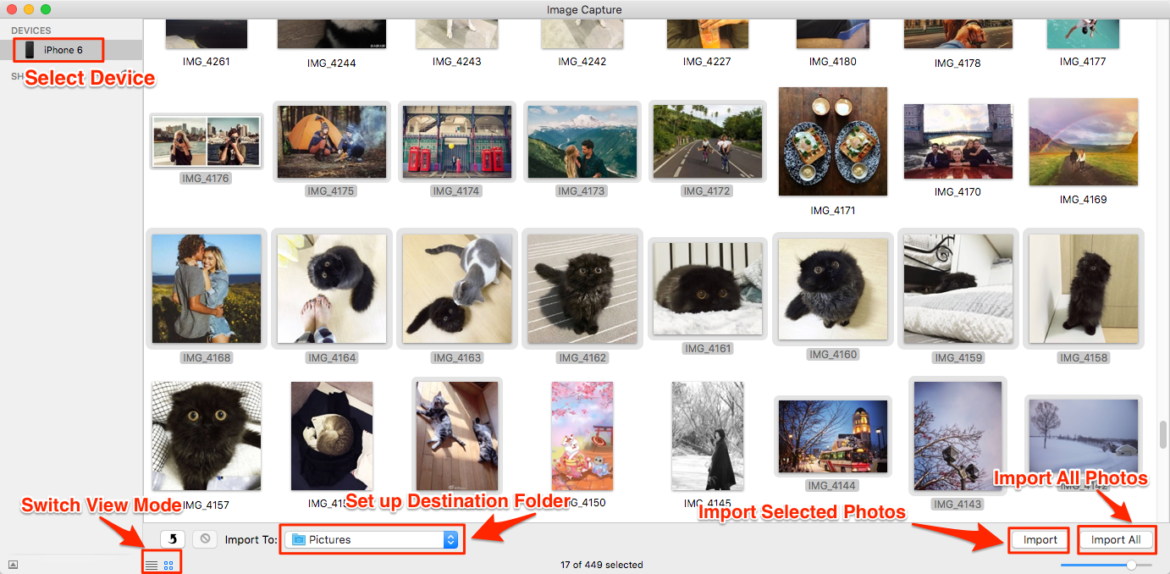
A picture showing how to transfer pictures from iPhone to Mac using the Image Capture tool on Mac computers.
- To begin, connect your iPhone to your Mac computer using the USB cable.
- Then, start the Image Capture tool on your Mac.
- From the device, list select your iPhone.
- Now, choose a folder to which you want to export your pictures.
- Lastly, click on Import or Import all to transfer images from iPhone to Mac.
You might also like:
- Easily Transfer Photos From iPhone To iPhone
- How To Transfer Photos From iPhone To Computer
- How To Do Google Reverse Image Search Using Google Images
- Use This Method To Tell Where A Picture Was Taken
- These Are The Best Apps For News
- How To Use Custom Gestures On iPhone/iPad
- How To Connect Phone To Projector