The Nexus 6 screen resolution is 1,440 x 2,560. The benefits of increasing or decreasing the Nexus 6 resolution varies. By reducing the Nexus 6 native resolution, battery life increases. Increasing the Nexus 6 display size shrinks the size of text and icons. Either way, this article teaches you everything you need to know about changing the screen density of the Nexus 6.
The article focuses on three methods for increasing the display density of the Nexus 6. The first method is a non-root method and requires ADB. The second, a root method, modifies the build.prop file. Don’t worry; all in all, the methods are relatively easy to complete.
Moreover, the article also focuses on decreasing the Nexus 6 screen size. This method requires a rooted Nexus 6 device. Furthermore, the method requires that you install an app to reduce the display size. We begin with the ways to increase the Nexus 6 screen real estate. Afterward, we discuss the steps necessary for decreasing the Nexus 6 resolution. Let’s start!
Benefits of Increasing Nexus 6 Resolution
Increasing the Nexus 6 screen resolution, mentioned above, minimizes the size of text & icons. This increase proves valuable in that it appears as though there’s a lot more room on the screen.
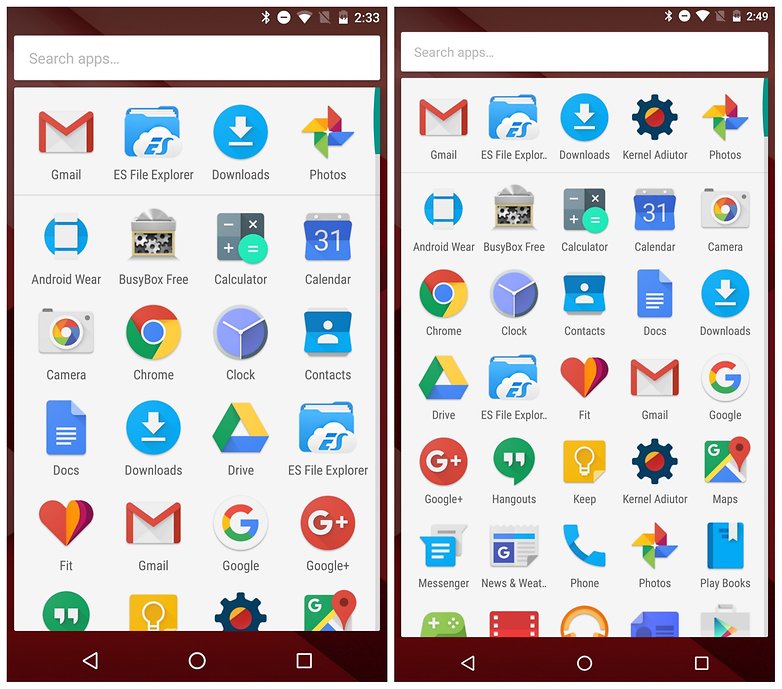
Moreover, the increase in the Nexus 6 resolution adds an extra row and column of icons to the app drawer. Five apps across instead of four and seven rows instead of the usual six. See the screenshot further down for a visual of this.
Luckily, changing the display density has no adverse effect on your Nexus 6. Change the DPI as you see fit. Do so until you find the settings that suit your needs. Also, revert to the original settings at any time. Number 1 benefit of increasing the display size? A neater looking interface.
How to Increase Nexus Display Density
This first method, as mentioned earlier, requires Android Debug Bridge (ADB). Download and install ADB for Windows by going here. Mac users, read our tutorial for downloading & installing ADB & Fastboot for Macs. Windows users also need the Java Development Kit (JDK). Download JDK here. Have all of these? Let’s move along.
ADB, as the name suggests, acts as a bridge between your computer and Nexus 6. Enter commands via one of your computers. As a result, the computer sends the command to the Nexus 6. The Nexus 6 executes the commands. Sounds simple enough, right?
The Java Development Kit (JDK) is a software development environment. With it, developers build Java applications and applets. You won’t be developing any apps, right? Still, it’s always good to have the Java software on your computer. Many apps need it to function properly. Time for the tutorial!
Use ADB commands – No Root to Modify Nexus 6 Screen Resolution
On the Nexus 6, enable USB debugging in Developer options. Use the links if you don’t know how to do this. Each link leads to an in-depth article. The first explains how to enable USB debugging on the Nexus 6. The second describes how to enable Developer options on the Nexus 6. Start with the latter and then move to the former.
Ensure that you downloaded and installed ADB. Find the links above. Once ADB installs, connect your Nexus 6 to the computer via a USB cable. Now, open a Windows Explorer window on your PC and open the ADB Tools folder. Find a blank space in the folder. Hold Shift and right-click your mouse. Select Open Command Window Here.
Type ADB devices in the command window and hit enter. A number appears in the command window identifying your Nexus 6. If not, install the Nexus 6 USB/ADB drivers and try again. Once the computer recognizes the Nexus 6, proceed with the rest of the tutorial.
Modify the Nexus 6 DPI with Command Prompts
Type ADB shell wm density 493. This command sets the Nexus 6 DPI to 493. 493 is the Nexus 6’s native density. Modify this number to your liking. Note, however, that each change in DPI requires a reboot. If the font size is a bit too small, go to Settings > Display > Font Size to change it.
Now, you have smaller icons on the home screen. There is more spacing around them. The number of app icons in the app drawer also increase. If graphical distortions occur, do not worry. The modified default settings cause these malformations to happen. Find a setting where you eliminate as much of the distortions as possible.
Consequently, type ADB shell wm density reset to restore the default settings. Other recommended settings include 492, 480, 500 and 520. However, as mentioned, tweak the number to you liking until you find your preference. Moreover, the lower the number, the smaller the icons on the screen appear.
Maximize Nexus 6 Resolution – Edit the build.prop file – Root Required
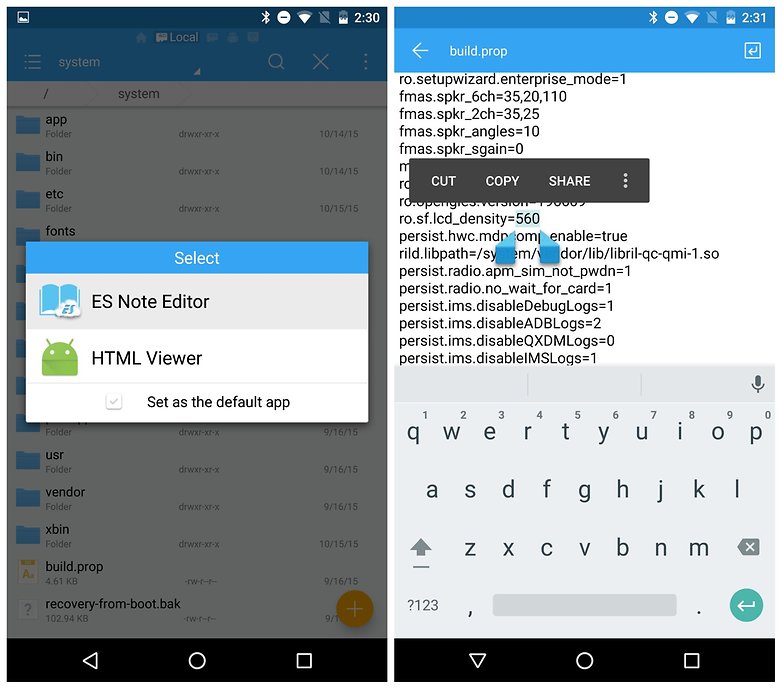
In addition to the non-root method above, you can edit the build.prop file. This approach requires a rooted Nexus 6. This process also requires ES File Explorer. The good thing about this method is that visual glitches in the ADB method do not exist in this step. Here’s what you need to do.
Launch ES File Explorer on the rooted Nexus 6. Be sure to enable root explorer in the navigation pane. Once enabled, navigate to /device/system. Once there, scroll down, tap on build.prop and select ES Note Editor from the list to open the text file. Now, tap the pencil icon to edit the file and scroll down until you see the following entry: ro.sf.lcd_density=560.
Nexus 6 Screen Resolution – 1,440 x 2,560 – Change DPI via ES Explorer
Change the 560 to 493 (or whatever density you prefer) and press the back arrow to exit. Confirm you want to save changes. Restart the Nexus 6 to see the change take effect. In any event, restore the default settings by going over the steps above and reset the number to 560. Now, let’s talk about decreasing the Nexus 6 screen resolution.
Advantages of Decreasing Nexus 6 Screen Resolution
Reducing the Nexus 6 display size provides a couple of benefits. The most sort after benefit being the possible increase in battery life. Furthermore, and this is for gamers, you can play games at 1080P.
Some games and apps only run at 1080P resolution, max! As a workaround, lower the Nexus 6 resolution from 1440 x 2560 pixels to 1080 x 1920 pixels. How do I do change my Nexus 6’s resolution?
As mentioned before, changing the display density has no adverse effect on your Nexus 6. Change the DPI as you see fit. Do so until you find the settings that suit your needs. Also, revert to the original settings at any time.
How to Reduce Nexus Screen Density
For this method to work, you need a rooted Nexus 6. Furthermore, download & install the Terminal Emulator app. This app is on the Google Play Store. Search for it or download the app via this link. Once installed, execute the commands below.
- First Command
- su
Type “su” in the Terminal Emulator app and hit enter. A prompt requesting to grant access to Superuser appears. Tap “Grant”.
- su
- Second Command
- wm size 1080×1920
Type “wm size 1080×1920” and hit enter. After this command, the visual effects get larger than normal. However, the change exists because of the modification in your device’s display resolution to 1080p. This command does not affect the device’s DPI value.
- wm size 1080×1920
- Third Command
- wm density 420
Type “wm density 420” and then hit enter. After the command executes, your device’s DPI value changes. The visual effects revert to their standard size. This command does not alter the size of all visual assets. To resize the rest of the items, use the next command.
- wm density 420
- Fourth Command
- stop && start
Type “stop && start” and hit enter. This command resizes the remaining assets. As you enter this command, your device reboots immediately. The DPI value resets on boot up.
- stop && start
To verify the change in screen resolution, download the Display Tester app. Launch the app and it displays the current resolution on the Nexus 6. Moreover, If you want to increase your resolution up to 1440 x 2560, here are the steps.
Firstly, start with the steps outlined above. Secondly, in the second step, enter the command as follows below:
- Su
- wm size 1440×2560
- e wm density 560.
- stop && start.
- In addition, reboot the Nexus 6 to complete the change.
Conclusion: How to Alter Nexus 6 Display Resolution
In conclusion, these are useful ways to increase & decrease the Nexus 6 resolution. By increasing the resolution, users get a more spacious and uncluttered look. Furthermore, these settings are alterable at any time. A decrease in the resolution allows you to run apps & games at 1080p. Moreover, a decrease in size possibly improves Nexus 6 battery life.
Al things considered, remember to backup all your files and data in the event of a malfunction. As noted, some of these tips require rooting the Nexus 6. For the most part, you are responsible for your Nexus 6. In the event that you do not know how to do this, have someone more experienced help you. To emphasize, do not proceed with the tutorial if you are uncertain.