Is the Android Lollipop update draining battery life on your Android device? Many users report that their battery drains fast after the Lollipop update. Luckily, there are battery saving tips that reduce the strain on you Android smartphone’s battery. Tweak settings to extend the battery life on the Lollipop OS.
In this article, we focus on Android Lollipop battery drain fixes. Battery drain is one of the many Lollipop OS problems. So, if you experience problems with latest Android update, this article is for you. Read through the article thoroughly. We outline very innovative ways to save battery life on your Android gadget.
What will you learn? You learn how to troubleshoot Android OS battery drain issues. Furthermore, you learn about Android OS battery drain fixes for the Lollipop update. We begin with the use of applications to prolong battery life and move from there. Let us begin!
Use Apps to Fix Battery Problem in Lollipop Update
On account of the many apps on the Google Play Store, it is hard to find a good battery app for Android smartphones. Furthermore, many of the apps tend to feature ads and unnecessary downloads.
To this end, we list the two of the best Android battery apps for you below. These battery saving apps for Android help manage, maintain and manipulate your Android device’s battery life.
Firstly, we discuss a lightweight and useful app called Greenify. Afterward, we discuss an application called 3C Toolbox. These two apps allow you to extend your Android phone’s battery life. Beyond that, neither Greenify nor 3c Toolbox requires root access. Although, for extended functionality, the app developers recommend root access.
Greenify
Greenify is a simple app. The Greenify app features a user-friendly interface. What does Greenify do? Well, to summarize, Greenify places background applications into a state of hibernation.
How does Greenify monitor and hibernate apps? Greenify checks the inactivity time of applications that you select for automatic hibernation. That is to say, when you minimize an app, Greenify monitors this app. If the app remains inactive for a period, Greenify closes the app.
To illustrate, if you’re using Facebook and then switch to the Twitter app, Greenify monitors the Facebook app and then closes it when the device screen goes off. Read about Greenify, the uses of the app, setup and features in our How to Use Greenify article.
This image is attached to an article that teaches you all the ways to troubleshoot & fix Android Lollipop OS Battery Drain Problems.
3C Toolbox
Our second featured app, 3c Toolbox, offers more than just app hibernation. 3c Toolbox is the go-to app to disable Google Play Services. In contrast, Greenify does not provide this feature. Furthermore, mentioned earlier, 3C Toolbox extends into monitoring WiFi, Firewall, GPU, CPU & more.
To demonstrate, 3C Toolbox incorporates features from Battery Monitor Widget, System Tuner & 3C Toggles. Moreover, 3c Toolbox pulls features from Titanium Backup Pro, ROM Toolbox, Advanced Task Killer, Greenify, System Panel, SetCPU, BetterBatteryStats, App2SD, Link2SD, etc.
For further information on 3c Toolbox, read more about the app, the uses of the app, setup, and features in our How to Use 3C Toolbox article. Now, we move to discuss tweaking the settings in the Lollipop OS to extend battery life. But first, here’s an image for you.
Greenify Vs 3C Toolbox
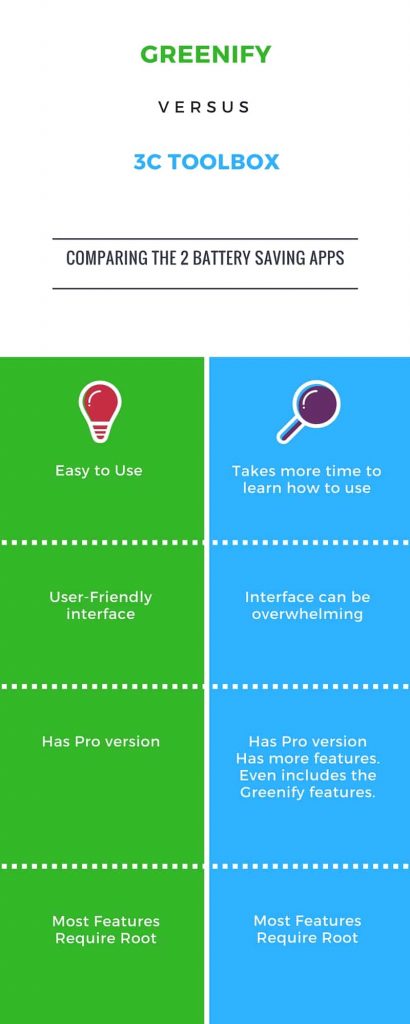
Greenify Vs 3C Toolbox – Best Battery Saver Apps for Android
Modify Android Lollipop Settings to Save Battery Life
To begin, turn off the automatic brightness setting on the Lollipop run device. Manually set the brightness to lower setting. Be sure not to go so low that you hardly see the screen’s contents. Reducing the display brightness is an easy way to improve battery life on the Android Lollipop OS.
In the same way, limit the location services on your Lollipop device. On account of extreme battery drainage, modify the Android OS GPS location services. This restriction, in turn, increases the battery life of your gadget. In addition to Google Maps, Social Networking apps like Facebook, Twitter & WhatsApp use the GPS functionality.
And, while location services are useful, modifying the settings boost battery life on the Lollipop OS. Without a doubt, battery life is the most important aspect of an Android device. To limit the location service on the Android Lollipop OS, do the following:
How to Tweak GPS Settings on Android Lollipop
Go into Settings > Location > Mode and find three options: High Accuracy, which uses GPS, Wi-Fi, and the mobile network to determine your position. This method, in turn, uses quite a lot of battery power.
Battery Saving Mode reduces battery drain. And, finally, Device Only, which only uses the onboard GPS. You can also turn off location services altogether, but of course, that then limits your devices capabilities.
Adjust the settings to your liking. I use the battery saving option. If I am out for a jog or walk, I momentarily use the High Accuracy setting.
Adjust the Sync Settings on Lollipop OS to Decrease Battery Depletion
In addition to location settings, tweak the Lollipop Sync settings to manage battery depletion. Synchronization delivers push notifications to your Lollipop device. These push notification include things such as emails notifications. Disabling Automatic Synching prevents overuse of the Lollipop OS’ resources & battery life.
In fact, disable unnecessary sync features and leave the important ones enabled. Of course, it is up to you to determine which features are important or not important. If you only have one email account, then you can safely leave the sync setting enabled. More than one, and you find yourself with a battery that lasts only a few hours.
To see what syncs or to disable synchronization, pull down the quick access bar on your Lollipop device. Click the icon near the settings button in the upper right-hand corner to expand for more options. Turn off Syn complete by the apping the icon or tap and hold for sync settings. Adjust the settings accordingly.
Check Android Lollipop OS Battery Information
Go into Settings > Device > Battery and see what’s making your Android Lollipop OS battery drain very fast. Tap on each of the apps, adjust the settings to improve battery performance on Lollipop. Furthermore, click on the dotted icon in the top right of the screen. See if the option for Battery Saver is available.
If you enable Battery Saver, specify when it activates (never, 5% battery or 15% battery). Activating battery saver restricts the over-usage of the battery. Battery Saver reduces app activity, disables syncing, dims the screen, etc. All done automatically. Customize these features to your liking for optimal battery performance on the Lollipop OS.
Do note that none of the tweaks are mandatory. You know what works best for you. To be honest, the Greenify & 3C Toolbox already save a ton load of battery life on my device. The extra settings I tweak when I need to squeeze the extra life out of my battery. Next, learn to calibrate your Android device battery.
Calibrate the Battery of your Lollipop Device
The Android operating system has a feature called Battery Stats. Battery stats keeps track of battery capacity. A corrupted battery stat displays data that isn’t real. For example, it causes the phone to turn off before reaching 0 percent. Calibrating your Android battery allows the Android OS to correct this information.
Of course, you can’t calibrate the battery. The battery is, after all, just a cell that stores and discharges energy. However, lithium-ion batteries include a printed circuit board (PCB) that serves as a protection switch. This protection switch prevents them from exploding or deep discharging.
How to Calibrate Android OS Battery without Root Access?
Please remember not to perform this process all the time. When your battery dies, and your phone won’t turn on, your battery has enough reserve charge to avoid system damage. Perform this process once every three months at the most. If it is required more often than that you have bigger problems at hand.
Put plainly: fully discharging a battery is not good for it. Trying to overload a battery is also bad for it. Charging batteries automatically shut off when they reach a safe limit. But again, do this only when necessary, because it does have an adverse impact on battery life.
Method 1
- Discharge your Android device entirely until it turns itself off.
- Turn it on again and let it turn off.
- Plug your phone into a charger. Without turning it on, let it charge until the on-screen or LED indicator says 100 percent.
- Unplug your charger.
- Turn your phone on. The battery indicator likely does not display 100 percent. Plug it in (leave your phone on for this) and continue charging until it says 100 percent on-screen as well.
- Unplug your phone and restart it. If it doesn’t say, 100 percent plug the charger back in until it says 100 percent on screen.
- Repeat this cycle until it says 100 percent when you start it up unplugged. Or as close as you think it’s going to get to 100.
- Now, let your battery discharge all the way down to 0 percent and let your phone turn off again.
- Fully charge the battery one more time without interruption and you should have reset the Android system’s battery percentage.
How to Calibrate Android OS Battery with Root Access?
Clearing the batterystats.bin file helps the Android system report the correct battery charge. Some claim that there is no correlation between the two. In the interest of fairness, we include this process for you here. In brief, it is the same process as above but with the added step of a root-enabled app.
Method 2
- Discharge your Android device entirely until it turns itself off.
- Turn it on again and let it turn off.
- Plug your phone into a charger. Without turning it on, let it charge until the on-screen or LED indicator says 100 percent.
- Unplug your charger.
- Turn your phone on. The battery indicator likely does not display 100 percent. Plug it in (leave your phone on for this) and continue charging until it says 100 percent on-screen as well.
- Unplug your phone and restart it. If it doesn’t say, 100 percent plug the charger back in until it says 100 percent on screen.
- Repeat this cycle until it says 100 percent when you start it up unplugged. Or as close as you think it’s going to get to 100.
- Now, install the Battery Calibration app.
- Before launching the app, ensure that your battery is at 100. Restart the device.
- Now, let your battery discharge all the way down to 0 percent and let your phone turn off again.
- Fully charge the battery one more time without interruption and you should have reset the Android system’s battery percentage.
Conclusion: How to Fix Battery Problem After Lollipop Update
To conclude, one should always ensure that the device in question does not have any defects. Hardware issues, much like software issues have adverse effects on your smartphones of tablets.
The tips outlined in this article help extend the battery life of devices running Android Lollipop. Your best option involves using applications like Greenify & 3C Toolbox. Furthermore, adjusting individual settings allow you to improve the overall Lollipop battery life further.
If all that fails then your only option to solve the problem is to wait for a bug fix to roll out to your phone. But that doesn’t help you out in the meantime if your phone is all but unusable. Your last resort is a factory reset. Thanks for reading how to fix problems with the latest Android update here on OrDuh!