Is the Windows Modules Installer Worker high CPU usage slowing down your computers? Above all, the Windows Modules Installer Service high disk usage occurs mostly on Windows 10. Users also report the high CPU usage on Windows 81. Moreover, no one seems to understand why this happens. It is also common to see this coupled with TiWorker.exe.
Windows Modules Installer Worker (WMI) is a Windows service. Therefore, you need not worry about viruses. It is not a virus. It is a service that searches for Windows Updates. Hence, it is a major component for a functional PC. Thus, one ought not to uninstall or try to uninstall Windows Modules Installer Worker.
For this reason, expect high CPU usage when Windows Modules Installer Service searches for updates. During download & install, expect high disk usage. Expect your computer to slow down a bit. However, if you experience slowness/high CPU usage outside of updating, here’s how to fix it. Let’s go!
What is Windows Modules Installer Worker?
The Windows Modules Installer Worker (TiWorker.exe) is a service of Windows, which works to update windows. The process of TiWorker.exe creates high CPU usage problems, and sometimes it consumes 100% of disk space.
WMI prepares your computer for update installation and frequently checks for new updates. A corrupt WMI results in a high CPU usage and sometimes also in 100% of disk usage. We have two solutions which help to fix the problem.
This article shows you how to use the services.msc to resolve the problem. Also, we discuss the usage of Windows Update Troubleshooter to solve the Windows Module Service high CPU usage issue. However, before this, let’s find out how to check CPU usage on the PC.
How to check CPU usage?
Windows Modules Installer Worker High CPU Usage – High Disk Usage Easy Fixes
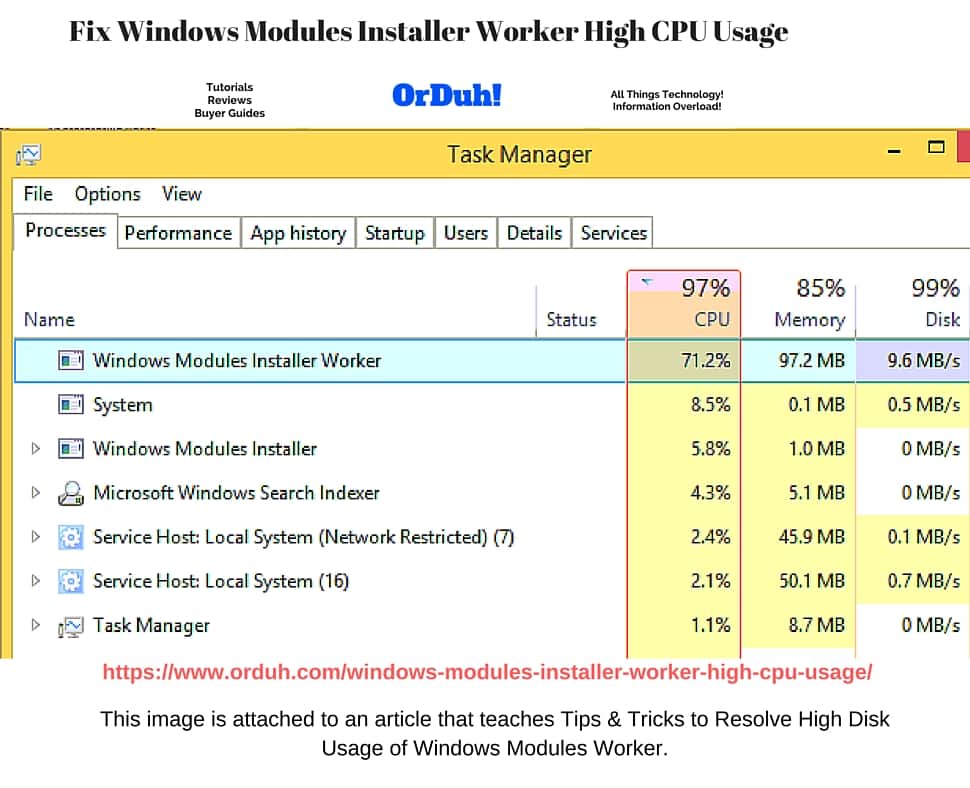
First, go to the Start menu > find and click on “Task Manager” > Click on View Running Process > Go to the Process Tab > Sort it by CPU. Take a good look. Does Windows Modules Installer Worker exhibit high CPU usage? Furthermore, is there an update in progress? Moreover, is Windows Update checking for updates at the moment?
If you answered yes to any of the above, then the high disk usage & CPU usage is normal. There is no need for alarm. Let Windows complete the update requirements. After a while, your resources return to normal. Use your computer as per regular.
However, if there is no update and the high CPU/Disk usage occurs. Use the following tips to resolve the tiworker.exe Windows Modules Installer Worker issue. Be sure to follow the instructions carefully!
Fix High CPU Usage – Use the services.msc
Firstly, press the [Windows] + [R] keys and type services.msc. Now, look for the “Windows Module Installer” and open the Settings. Switch the start type to manual. Also, repeat the above steps for the Windows Update service.
Now, open the Control Panel. Click on Windows Update. On the left-hand side, locate the option to change settings. Select “Check for updates but let me choose whether to download and install them.” Finally, reboot the computer.
As a result, Windows Update now allows you to select which updates to install. Furthermore, this fix resolves the Windows Modules Installer high CPU usage affecting Windows 10 & Windows 8.1. However, if high disk usage persists, read on for the next fix in the series.
Fix High Disk Usage – TiWorker.exe via Windows Update Troubleshooter
Firstly, download the Windows Update Troubleshooter. Now, once installed, run the WindowsUpdateDiagnostric.diagcab. The tool checks the registry keys to fix potentially corrupt files & programs. Of course, this takes time. Be patient and do not close the window.
Once finished the tool returns a message that reads “Troubleshooting has completed.” At this point, click the close button. Also, close any and all open programs. Of course, save your work before closing programs like Word. Lastly, restart the computer.
Once the computer reboots, check the task manager. Verify that TiWorker.exe or Windows Modules Installer Worker no longer occupies much of your CPU & Disk usage. If not, then that’s great! Enjoy your freed up resources.
Windows Modules Installer Worker Fix
- Open services.msc:
- Search “Windows module installer.”
- Double click the “Windows module installer,” and make it manual (right click on service -> choose Properties -> Startup type: Manual). By default, it uses Automatic.
- Search “Windows update“.
- Double click the “Windows Update,” and make it manual.
- Open Control panel (right click at the lower left of the screen at the Windows logo. and then you can see control panel menu).
- Click “Windows Update.”
- In left, you can see “Change settings.”
- Modify the configuration to “Check for updates but let me choose whether to download and install them.” Usually, it defaults to automatic.
- Reboot Windows virtual machine.
Conclusion
Before we conclude, remember to check Windows Update regularly after setting it to manual. Also, for your information, read up on Windows Installer and its functions on Wikipedia.
To conclude, Windows Modules Installer Worker is an essential part of Windows 10 & Windows 8.1. Furthermore, one expects high CPU usage & disk usage during regularly scheduled updates. However, if high resource usage occurs outside of scheduled updates, this causes concern. The tips above assist in troubleshooting the underlying problem.
Thank you for reading how to fix Windows Modules Installer Worker High CPU Usage on OrDuh! Remember, if you need help, leave us a comment, and we’d respond accordingly. Also, check out our post on How to Fix TiWorker.exe High CPU Usage & How to Fix IAStorDataSvc High CPU Usage. Furthermore, visit our guides page or Microsoft Windows guides for more tips & tricks. Finally, please share our articles on Social Media so that others can get help too.
No offense, but I’m not going to download something to fix anything. Please either tell us how to disable it or simply do not tell us. Please do not expect us to download a “tool” when it really isn’t necessary.
What we want to know is if you can simply kill it and be done with it.
Then look elsewhere for an answer. It is that simple. I shall assume that you are skilled enough to use Google.
Worked just fine thanks for the help!
“There is no need for alarm. Let Windows complete the update requirements. After a while, your resources return to normal. Use your computer as per regular.”
I don’t mean to be rude, and I realize this is the new norm, but let’s not be passe about this. The lack of control you have in Windows 10 is alarming. I use my computer for computing, and when I first turn on my computer 50% of the CPU is being for taken for 30 minutes after booting up, without my control, this is very troubling. There is no reason they can’t throttle the process to where it isn’t a noticeable performance impact. I appreciate you taking the time to write this article, however, I ask that as part of the community dealing with these abuses, please call them out as such. Say something like “There is no need for alarm, this is due to Windows 10’s poor windows update design. There’s also nothing you can do about it because they’ve taken your ability to change or schedule the way these processes work.”